Docker安装APM Server

Table of Contents
前端性能监控 - This article is part of a series.
官方文档 #
- elastic organization github homepage
- APM Agents
- Legacy APM Server
- Elasticsearch
- Kibana
- APM Real User Monitoring JavaScript Agent(Angular integration)
- Run APM Server on Docker
- docker-elk 模板
传统的安装部分可以跳过,因为现在一般都是安装在docker上,我们可以直接使用官方或者第三方已经写好的dockerfile等文件替代传统的安装方式。
介绍 #
Q: What is APM? #
A: Free and open application performance monitoring
Elastic APM is an application performance monitoring system built on the Elastic Stack. It allows you to monitor software services and applications in real-time, by collecting detailed performance information on response time for incoming requests, database queries, calls to caches, external HTTP requests, and more. This makes it easy to pinpoint and fix performance problems quickly. Elastic APM also automatically collects unhandled errors and exceptions. Errors are grouped based primarily on the stack trace, so you can identify new errors as they appear and keep an eye on how many times specific errors happen. Metrics are another vital source of information when debugging production systems. Elastic APM agents automatically pick up basic host-level metrics and agent-specific metrics, like JVM metrics in the Java Agent, and Go runtime metrics in the Go Agent.
APM Server #
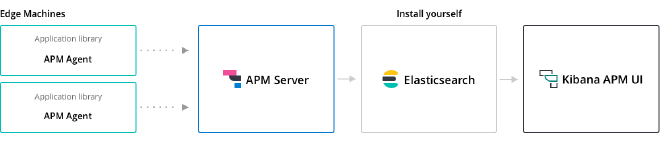
APM Server是elastic家推出的前端性能监控方案的组成部分。它接收从Elastic APM agents发送来的信息并转发到Elasticsearch documents中存储,最后在Kibana中进行性能指标的可视化。
install Prerequisite #
apm-server 依赖 elk, 所以在安装apm-server之前至少要安装 elastic search 和 kibana。elastic官方提供了elk镜像,我们可以非常快捷地通过docker进行安装。docker-compose.yml的主要结构如下:
version: "3"
services:
    elasticsearch:
      image: elasticsearch:${ELK_VERSION}
      ports:
        - "9200:9200"
        - "9300:9300"
      networks:
        - elk
    kibana:
      image: kibana:${ELK_VERSION}
      ports:
        - "5601:5601"
      depends_on:
        - elasticsearch
      networks:
        - elk
    apm-server:
      image: elastic/apm-server:${ELK_VERSION}
      ports:
        - "8200:8200"
      depends_on:
        - elasticsearch
      networks:
        - elk
networks:
  elk:
    driver: bridge
其中变量声明在了.env文件中,版本可以自己指定,但不能是latest,必须指定:
ELK_VERSION=8.11.0
除此之外很重要的一部分就是进行ELK的配置。 On the other hand, 如果就按上面的配置,然后docker-compose up启动然后访问localhost:5601已经可以访问到如下界面:

点击Where do I find this?,可以看到:
The enrollment token is automatically generated when you start Elasticsearch for the first time. You might need to scroll back a bit in the terminal to view it.
To generate a new enrollment token, run the following command from the Elasticsearch installation directory:
bin/elasticsearch-create-enrollment-token --scope kibana
所以进入Elasticsearch容器的/usr/share/elasticsearch目录,执行上述命令即可。然后复制生成的token,输入后进入下一步,Verification required:

Copy the code from the Kibana server or run
bin/kibana-verification-codeto retrieve it.
所以按照指示,进入kibana容器的/usr/share/kibana目录,执行上述命令,填入生成的验证码即可。若上述步骤没有问题,接下来就会来到登录界面:

built-user #
官网有介绍内建用户的文章: Built-in users
-
elasticA built-in superuser.
-
kibana_systemThe user Kibana uses to connect and communicate with Elasticsearch.
-
logstash_systemThe user Logstash uses when storing monitoring information in Elasticsearch.
-
beats_systemThe user the Beats use when storing monitoring information in Elasticsearch.
-
apm_systemThe user the APM server uses when storing monitoring information in Elasticsearch.
-
remote_monitoring_user
鉴权注意 #
一 #
Starting with Elastic v8.0.0, it is no longer possible to run Kibana using the bootstraped privileged elastic user.
也就是说。自从v8开始,不能使用使用默认密码的超级用户elastic登录kibana了,要想用elastic用户登录需要先修改elastic用户的密码。

二 #
Elasticsearch 从 6.8 开始, 允许免费用户使用 X-Pack 的安全功能,且默认开启。如果不开启,许多功能无法使用,比如如果不开启,kibana 现在是没办法连接到 elastic search的,老用户不要觉得下面的设置麻烦而直接xpack.security.enabled=false关闭安全特性。可以说,这是必须开启的。
WARN LOG #
可能会遇到 Elasticsearch showing received plaintext http traffic on an https channel in console问题。
修改密码 #
有三种修改密码的方式。
方法一、启动前修改配置文件 #
在.env文件里添加变量:
ELASTIC_PASSWORD=your_password_here
然后docker-compose.yml里配置环境变量映射到elastic search的配置文件里:
version: "3"
services:
    elasticsearch:
      image: elasticsearch:${ELK_VERSION}
      ports:
        - "9200:9200"
        - "9300:9300"
      environment:
      # ":-" 表示使用默认值。具体来说,这个语法表示如果ELASTIC_PASSWORD已经定义了,那么使用它的值;如果没有定义,那么就使用默认值,这里的默认值是空。
        ELASTIC_PASSWORD: ${ELASTIC_PASSWORD:-}
      networks:
        - elk
然后docker-compose up重新启动即可,输入elastic和修改后的密码即可登录成功。
方法二、命令行修改 #
elastic search 安装目录的 /bin 文件夹里有很多工具,其中就包括设置以及修改密码的工具。
设置密码 #
sh-5.0$ bin/elasticsearch-setup-passwords interactive

******************************************************************************
Note: The 'elasticsearch-setup-passwords' tool has been deprecated. This       command will be removed in a future release.
******************************************************************************

Initiating the setup of passwords for reserved users elastic,apm_system,kibana,kibana_system,logstash_system,beats_system,remote_monitoring_user.
You will be prompted to enter passwords as the process progresses.
Please confirm that you would like to continue [y/N]
修改密码 #
sh-5.0$ bin/elasticsearch-reset-password --interactive -u elastic

This tool will reset the password of the [elastic] user.
You will be prompted to enter the password.
Please confirm that you would like to continue [y/N]y


Enter password for [elastic]:
Re-enter password for [elastic]:
Password for the [elastic] user successfully reset.
新增用户 #
sh-5.0$ elasticsearch-users -h
Manages elasticsearch file users

Commands
--------
useradd - Adds a file user
userdel - Deletes a file based user
passwd - Changes the password of an existing file based user
roles - Edit roles of an existing user
list - List existing file based users and their corresponding roles

Non-option arguments:
command

Option             Description
------             -----------
-E <KeyValuePair>  Configure a setting
-h, --help         Show help
-s, --silent       Show minimal output
-v, --verbose      Show verbose output


sh-5.0$ elasticsearch-users useradd esadmin
Enter new password:
Retype new password:
权限控制 #
查看上面的输出,可以看到该命令还能删除用户,编辑权限等:
sh-5.0$ elasticsearch-users roles -h
Edit roles of an existing user

The roles command allows editing roles for file based users.
You can also list a user's roles by omitting the -a and -r
parameters.

Non-option arguments:
username

Option             Description
------             -----------
-E <KeyValuePair>  Configure a setting
-a, --add          Adds supplied roles to the specified user (default: )
-h, --help         Show help
-r, --remove       Remove supplied roles from the specified user (default: )
-s, --silent       Show minimal output
-v, --verbose      Show verbose output
比如我刚创建的esadmin用户现在还不能登录kibana:

添加下列权限后就可以成功登录了。(具体权限查看 Built-in roles)
sh-5.0$ elasticsearch-users roles -a kibana_system esadmin
sh-5.0$ elasticsearch-users roles -a superuser esadmin
查看权限:
sh-5.0$ elasticsearch-users roles -v esadmin
esadmin        : kibana_system,superuser
这一部分非常感谢这篇博客 ELK Kibana 8.3.2登录认证, 我是从这篇博客了解到该知识并顺藤摸瓜摸到官方文档的。
方法二、es api修改 #
这部分也是从 docker中设置elasticsearch、kibana用户名密码、修改密码受到的启发。
在kibana的Dev Tools Console修改 #
要想使用该方法,需要先了解curl(client url)的简单用法,参考:
阮一峰老师的博客。
修改密码的API参考: Change passwords API
比如:
POST /_security/user/elastic/_password
{
  "password" : "helloworld"
}
或者还可以在终端通过curl直接修改。
终端curl修改
#
curl -XPOST -D- 'http://localhost:9200/_security/user/esadmin/_password' \
    -H 'Content-Type: application/json' \
    -u elastic:helloworld \
    -d '{"password" : "helloworldagain"}'
看起来是没问题的,但好像是安全问题,返回:curl: (52) Empty reply from server。暂时不研究了,如果有人知道是为什么可以告诉我。
TL;DR; #
最终的最简单的配置:
.env #
ELK_VERSION=8.11.0
ELASTIC_PASSWORD='changeme'
KIBANA_SYSTEM_PASSWORD='changeme'
APM_SYSTEM_PASSWORD='changeme'
docker-compose.yml #
version: "3"
services:
    elasticsearch:
      image: elasticsearch:${ELK_VERSION}
      ports:
        - "9200:9200"
        - "9300:9300"
      environment:
      # ":-" 表示使用默认值。具体来说,这个语法表示如果ELASTIC_PASSWORD已经定义了,那么使用它的值;如果没有定义,那么就使用默认值,这里的默认值是空。
        - ELASTIC_PASSWORD:${ELASTIC_PASSWORD:-}
      networks:
        - elk
    kibana:
      image: kibana:${ELK_VERSION}
      ports:
        - "5601:5601"
      environment:
        - KIBANA_SYSTEM_PASSWORD:${KIBANA_SYSTEM_PASSWORD:-}
        - I18N_LOCALE:zh-CN
      depends_on:
        - elasticsearch
      networks:
        - elk
    apm-server:
      image: elastic/apm-server:${ELK_VERSION}
      ports:
        - "8200:8200"
      environment:
        - APM_SYSTEM_PASSWORD:${APM_SYSTEM_PASSWORD:-}
      depends_on:
        - elasticsearch
      networks:
        - elk
networks:
  elk:
    driver: bridge
安装APM插件 #
https://www.elastic.co/guide/en/apm/guide/current/configuration-rum.html
https://www.elastic.co/guide/en/apm/agent/rum-js/current/angular-integration.html
https://www.elastic.co/guide/en/elasticsearch/reference/8.1/service-accounts.html

最后的apm-server.yml:
apm-server:
  host: apm-server:8200
  frontend.enabled: true
  frontend.allow_origins: "*"
  rum:
    enabled: true
    allow_origins: ['*']
    allow_headers: ["header1", "header2"]
    library_pattern: "node_modules|bower_components|~"
    exclude_from_grouping: "^/webpack"
  auth:
    anonymous:
        rate_limit.event_limit: 300
        rate_limit.ip_limit: 1000
        allow_service: ['my-service-name', 'hello-world']

output.elasticsearch:
  enabled: true
  hosts: ["elasticsearch:9200"]
  username: "logadmin"
  password: "123456"

setup.kibana:
  host: "kibana"
  username: "logadmin"
  password: "123456"
Source Map #
https://www.elastic.co/guide/en/apm/guide/current/source-map-how-to.html
https://angular.cn/guide/workspace-config#complex-configuration-values